
Readers like you help support Explaining Android. When you make a purchase using links on this site, I may earn an affiliate commission.
If you have unlocked the bootloader of your Samsung Galaxy S23 and made changes, you may find yourself wanting to revert everything back to its original firmware. This is done with a program called Odin but requires us to download the stock ROM, extract it, and then install it while the device is in Download Mode. I can show you all of the steps involved here today.
If you’re not familiar with rooting your Android smartphone and installing various modifications then you may not enjoy things like manually installing OTA updates. In many cases, you can’t just uninstall root and go about your day. Instead, we need to manually flash the stock firmware back to the device.
You’ll also want to go through these steps if you want to relock the bootloader as well. This process will work for the base version of the Galaxy S23, the larger Galaxy S23+, and the high-end Galaxy S23 Ultra.

Downloading the Stock Firmware
Before we can install the original firmware we need to download it first. This can be done with a standalone piece of software for Windows called Frija or it can be downloaded from a website SamMobile or SamFW.
You will need to enter the model number of your device as well as its Region Code (also known as the CSC Code). Since Samsung releases devices all over the world, they have firmware that matches the laws and regulations for specific countries. So, if your Galaxy S23 is from Japan, then you’ll want to download the firmware that matches its country of origin. Failing to follow this suggestion could result in certain hardware or software features no longer working.
Note: Check out these great Samsung Galaxy S23 Cases!
After the firmware has been downloaded, you will want to extract its contents with a program like 7zip, WinZIP, WinRAR, or the built-in Windows alternative.
You should see at least 4 files included in the firmware including. . .
- AP_S911XXXXXXXX
- BL_S911XXXXXXXX
- CP_S911XXXXXXXX
- CSC_OWO_S911XXXXXXXX
- HOME_CSC_OWO_S911XXXXXXXX
The actually filenames will be different depending on which model you own, which region code you downloaded, and which monthly firmware you downloaded.
Download and Extract Odin
You will also need to download and extract a program called Odin. This is a firmware tool for Samsung Galaxy smartphones and tablets on Windows computers. I have uploaded the version of Odin that I use for my Samsung Galaxy S23 so that you can download it as well.
Again, this needs to be downloaded and extracted the same way you extracted the firmware from above.
Boot the Galaxy S23 into Download Mode
Once you have your files ready, we then need to put the smartphone into a special boot mode. I have already written an article and recorded a video showing how to boot the Galaxy S23 into Download Mode. So if you’re not familiar with this process, I recommend you check out that content and then come back here.
We need the Galaxy S23, Galaxy S23+, or Galaxy S23 Ultra connected to the PC with a USB cable as well.
As long as you have the proper USB drivers installed and the phone connected to the PC while it is in Download Mode then Odin should detect it. We need for Odin to say the device has been “Added” so the program can flash the firmware properly. You may need to install a piece of software from the OEM called Samsung Smart Switch if you don’t have the correct USB Drivers installed.
Flash the Stock Firmware with Odin
You have already done most of the work so the rest should be rather easy. We now need to load up the required files into Odin and then begin the installation process.
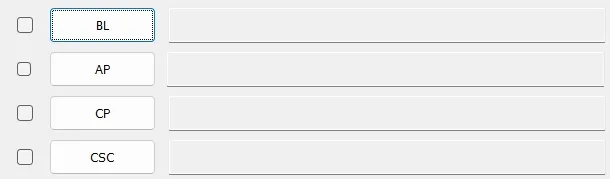
- Click on the BL button.
- Then select the firmware file that begins with the letters BL.
- Then click on the AP button.
- So that you can select the firmware file that begins with the letters AP.
- Now click on the CP button.
- And then select the firmware file that begins with the letters CP.
- Finally, click on the CSC button.
- Then select the firmware file that begins with the letters CSC.
Note: Do NOT load the HOME_CSC file in the CSC slot. This will result in your user data remaining in place and means that the phone has not been wiped properly.
You will likely notice that Odin seems like it has frozen after you select the AP firmware file. I recommend that you give it a few minutes to work through the file as it is likely many GB in size and it will take some time in order to load properly. If it takes more than 10 minutes then you can force close the Odin program and try again.
When you’re ready to begin flashing the stock firmware to the Samsung Galaxy S23 series smartphone, click the Start button and wait for the process to be completed. The amount of time it takes for Odin to install the original firmware will depend on a few factors like the quality of your USB cable and the size of the firmware. In my experience, it shouldn’t take more than 10-15 minutes to finish.
Note: Flashing the stock Galaxy S23 firmware will erase all of your data so backup any important bits ahead of time.
Reboot and Activate Android
When Odin is done flashing the firmware your Galaxy S23+ should reboot on its own. That is, assuming it did not run into any errors during the process. Be sure to follow along with the text in the log window to check for any issues that may have happened. The first boot back into Android will likely take longer than you’re used to.
This is because Android has just been completely reset and the software needs to set some things back up again.
You will see the Android activation screen appear so you can set the phone up and log back into your Samsung and/or Google account(s). It will be as if you had just taken the smartphone out of the box again. The device will be completely wiped and when you get back to the Android home screen you can begin to restore all of your backed up data.
Video Demonstration
Conclusion
If this is your first time going through this process then try to not let it get to you. It can be daunting at first glance but it is rather straightforward as long as you follow all of the steps laid out in this tutorial. It’s become so second nature to me that I can get through it in less than 15 minutes once I have the firmware downloaded and extracted on my PC.
Just make sure you’re downloading the correct firmware and you should be good to go. I will be writing up a guide on how to find the correct CSC region code for your device soon. So stay tuned for that article here on the website in the near future.