
Readers like you help support Explaining Android. When you make a purchase using links on this site, I may earn an affiliate commission.
While Samsung Galaxy 23 models sold throughout North America are not allowed to have its bootloader unlocked, those sold in other parts of the world can. Once you unlock the bootloader you can then install popular modifications to your device that change the filesystem. Magisk is currently the go-to tool for gaining root access on all three of these devices.
So it doesn’t matter if you have the base model of the Galaxy S23, the larger Galaxy S23+, or the more premium Galaxy S23 Ultra. We can install Magisk to gain root access using the exact same steps.
However, as mentioned, before we can root the phone we first need to unlock the bootloader. This is something that I have already shown you how to do in a previous tutorial here on this website. If you haven’t done this on your device yet then you will need to learn how to unlock the bootloader of the Galaxy S23 before you proceed with this guide.

Download the Firmware
To start, we will need to download the firmware that matches what is currently installed on your device. If you’re not familiar with finding the CSC Region Code for your phone, then you may want to watch this video to learn more. But beyond that, you will also need to the firmware to match the same monthly security update you have on your device. We’ll be patching it with Magisk and installing it on top of what you currently have.
Personally, I use a program called Frija to download the latest Samsung firmware files for my device.
With the firmware downloaded onto your PC, the next step is to extract its contents. I use a program called 7zip but others tend to prefer WinRAR or WinZIP. These days, Windows itself seems to be able to do the job for us, though.
Install the Magisk APK
Now, let’s turn your attention back to the Galaxy S23, Galaxy S23+, or Galaxy S23 Ultra that you own.
Visit the Magisk Github project page so that you can download the latest version to your smartphone. After the APK file has been downloaded, you will need to sideload (aka install) it onto your device. Usually, this just means selecting/opening the APK file in your file explorer of choice. A installation prompt will appear and you will be able to install it after you grant the app access to install APK files.
Patch the Samsung Firmware File
With the firmware downloaded and extracted onto your PC, you will then need to copy the file that begins with the letters AP. Then paste that file into the internal storage of your Samsung Galaxy S23 series smartphone. It doesn’t matter where you save it but I usually just store it in the Downloads folder so it is easily accessible.
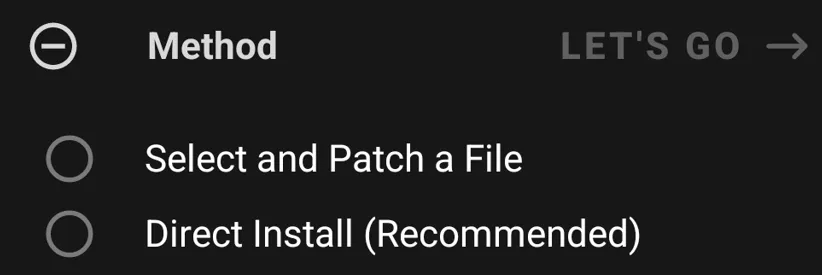
- Now, let’s open up the Magisk application.
- Then tap on the Install button from within the top card of the app.
- Choose the “Select and Patch a File” option.
- Select the firmware file that begins with the letters AP.
- And wait for Magisk to patch the file.
You should be told that Magisk has extracted the contents of your AP firmware file, modified it with the proper code, and then packaged it back up into a new file. This new file is usually labeled something like magisk_patched_XXXXXX with a random string of letters/numbers at the end.
We then need to copy that magisk_patched file and paste it back into the same folder on the PC that contains the other firmware files. We have basically patched the major firmware file (that begins with the letters AP) so that it includes the files that allow us to have root access.
Our next step is to flash (aka install) that patched firmware onto our smartphone.
Flash with Odin
You have done most of the work by now so let’s wrap things up by downloading Odin to your PC. This is the version that I have been using with my Galaxy S23 so it should work just fine for you. Once the file has been downloaded, it needs to be extracted just like we did with the firmware file.
Double click on the Odin EXE file and before completing these steps. . .
- Boot into Download Mode.
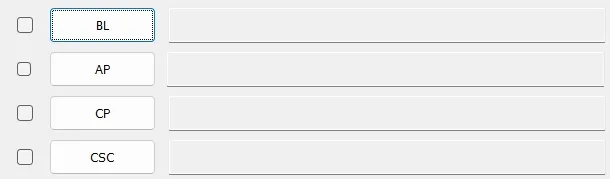
- Click on the BL button.
- Then select the firmware file that begins with the letters BL.
- Then click on the AP button.
- So that you can select the magisk_patched file.
- Now click on the CP button.
- And then select the firmware file that begins with the letters CP.
- Finally, click on the CSC button.
- Then select the firmware file that begins with the letters CSC.
Note: It is important that you select the actual CSC file and NOT the file that begins with the letters HOME_CSC. We need the internal storage to be wiped when going from an unrooted Samsung Galaxy S23 series device to a rooted one.
With all of those files loaded into Odin properly, go ahead and click on the “Start” button at the bottom of the window. You will want to make sure you do not touch the Galaxy S23, Galaxy S23+, or Galaxy S23 Ultra while the program is working. I also recommend not touching the USB cable that it’s connected to either. You could send your phone into a bootloop if you interrupt the process with an unstable connection.
When Odin has finished, the device should reboot on its own. You will be taken to the Android activation screen where you can set everything back up again.
If you don’t see the Magisk icon in the App Drawer then install it again from the Github page linked above. Then open it up and see if the app needs to do any additional setup. This is common and the app will tell you to it needs to reboot to complete the installation. After it boots back up, check the Magisk app again to see if it says the binaries are installed in that top card. You can even download and install a root checker app from Google Play to test things out.
Video Demonstration
Conclusion
The community has gotten really good at doing these Galaxy S23 root mods with Magisk lately. When a new version comes out, it may take a couple of weeks for the app to get updated with support. But I haven’t seen them getting stuck on this task for very long.
The process has been the same for Samsung Galaxy devices for quite a while now. The firmware just needs to be downloaded, extracted, patched, and then installed.
Let me know if you come across any issues with this tutorial. I may not be able to help everyone but usually if something goes wrong then it’s a quick fix due to a step being missed along the way. Either way, share your experience down in the comments section below.