Readers like you help support Explaining Android. When you make a purchase using links on this site, I may earn an affiliate commission.
Even though Google just released a brand new beta for Android 15, we can still gain root access after patching the correct file with Magisk. I’ll be using the Google Pixel 8 in my example here but this will work with all compatible devices that have Android 15 QPR1 Beta 1 installed. Pixel 6 series owners can follow this guide too, just make sure to review the section to know which file to patch and which command you use to patch it.
Requirements
You will need to have ADB & Fastboot tools installed on your PC in order to flash the modified boot.img/init_boot.img file. You could download these directly from Google, or you could use the link above to install ADB & Fastboot++. The advantage of using the program I linked above, is that it will give you a desktop shortcut to open a command prompt in the same folder as your ADB & Fastboot binaries.
That’s important for those who are getting error messages saying fastboot.exe is not a recognized command.
You will then need to unlock the bootloader of your smartphone. This process hasn’t changed in a while so if you have a Google Pixel device then follow the guide that I have linked on this page. Just be aware that when you unlock the bootloader it will erase everything you have on your device. So be sure to back up your important files ahead of time.
If you have a non-Pixel smartphone then let me know which phone it is down in the comments section below.
Lastly you’re going to need to download the same version of the firmware that you have installed on your device. I have linked to the Google Pixel factory images page for the Android 15 QPR 1 Beta 1 release on this page. There, you’ll find your supported Google Pixel device and then you can download the appropriate firmware. Just be sure that you have the same build number as the firmware you’re downloading (which can be found in the About Phone section of the Settings).
This is important for those who may have already updated their device to Android 15 QPR2 Beta 1. . .or Android 15 QPR1 Beta 2. Whichever comes next. The firmware you’re patching must be the same firmware that is installed on your device or you will end up in a bootloop.
Patching the Firmware with Magisk
Once you have all of that setup, your next step is to download and install the Magisk APK file. I always recommend you download this from the official Magisk GitHub repository so that you are absolutely sure it isn’t an imposter. Gaining root access can open up a ton of vulnerabilities if you don’t know what you’re doing. So always sideload the Magisk APK file from the official GitHub project page.
After the APK file has been installed, go ahead and open it up to make sure it works properly.
Your next step is to extract the firmware you downloaded from the Android website. Once those files have been extracted, you’ll want to look for another ZIP file within there. This is labeled image-[codename]-beta-ap41.[buildnumber].zip. Where [codename] is replaced for the codename of your device (Shiba in the case of the Pixel 8) and the [buildnumber] is replaced with the build number of the firmware (240726.009 is the build number for Android 15 QPR 1 Beta 1 for the Pixel 8).
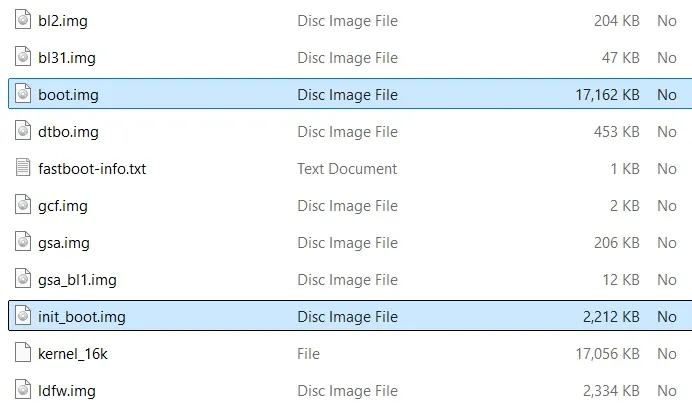
Now, when you extract that second ZIP file, you will then see two files that will be important.
- Pixel 6 owners will want to patch the boot.img file
- Pixel 7, Pixel 8, Pixel 9, Pixel Tablet & Pixel Fold owners will want to patch the init_boot.img file
So transfer the important IMG file to your Google Pixel smartphone. In my case, I’ll copy the init_boot.img file to my Pixel 8. But if you have the Pixel 6 then you’ll move the regular boot.img file.
Once the file has been transferred to your smartphone, go ahead and open the Magisk application again. You’re going to need to tap on the Install button with the top “card” that is labeled “Magisk.” Then you’ll choose the “Select and Patch a File” option from the next menu. This will launch a file browser where you will select boot.img/init_boot.img file that you just transferred over.
When you’re ready, tap the “Let’s Go” button that you see in blue.
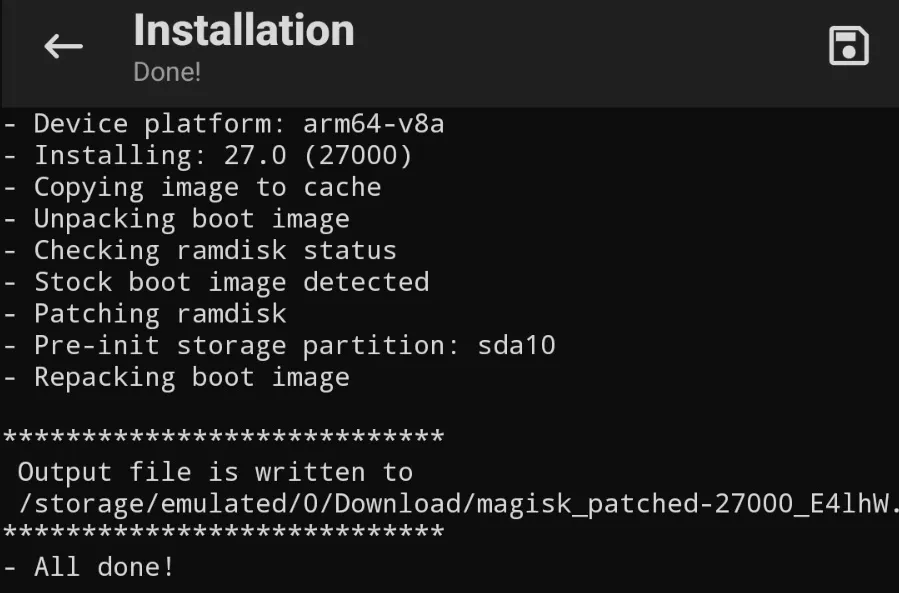
You’ll see some text scroll on the screen as the Magisk application begins doing the work for you. It will then tell you that it has created an “output” file in the /Downloads directory. This file is labeled magisk-patched-[version]_[random] where [version] is the version of Magisk that you’re using and [random] is just a random set of characters so the app doesn’t try to overwrite any previously patched files.
Flash the Patched File in Fastboot Mode
You’re going to need to take that magisk_patched file and transfer it to your PC. This file needs to be put in the same directory as your ADB & Fastboot tools (in order to make this guide easy to follow). Technically, you can put it anywhere, and then drag and drop the file into the command prompt at the end. But that can create unintended bugs when the method I detail here is will avoid those long pathname issues.
For me, I have an “Android” directory within the E:\ drive where I keep my ADB & Fastboot binaries. But it can be anywhere on your PC. Just make sure you see which folder the adb.exe and fastboot.exe files are in, and then copy that magisk_patched file into that same directory.
You’re then going to need to reboot the Google Pixel 6 into Fastboot Mode. There are a number of guides that will show you how this is done. You could use the command adb reboot bootloader if you have USB Debugging enabled or you could use the Google Pixel Fastboot Mode button combination method. I recommend the latter as it usually the easiest.
Let’s also rename that file to root.img in order to make this command much easier to follow.
Now, open up a Command Prompt, Windows PowerShell, or a Terminal window from within that same folder. Personally, I hold the SHIFT button down on the keyboard and right click on an empty spot within that folder. This brings up a special context menu where I can then choose “Open in Terminal” or “Open PowerShell window here” (either option will work the same).
You’re then going to need to type out one of the following commands. Depending on if you own the Pixel 6 or the other Pixel devices.
Pixel 6 Command
fastboot flash boot root.imgPixel 7-9 Command
fastboot flash init_boot root.imgIf you’re following along then you’ll understand why these commands are different. Older Pixel devices are using the boot.img file that needs to be flashed to the boot partition. While newer Pixel devices use the init_boot.img file and that needs to be flashed to the init_boot partition.

You’re going to want to make sure you get two OKAY messages in response to this command. One for sending the file to the device and then one for writing the file to the partition.
Reboot for Root Access
If everything went smoothly, you’re basically done with the hard work. The next step is to make sure the Start option is selected within Fastboot Mode (this is usually what is shown by default) and then press the Power button to select it. That will start the Android system and reboot you back into the operating system. The boot process should be rather quick as you’ve already done most of the work.
But before you can begin to reap the rewards, it’s recommended that you launch the Magisk application. The application will usually need to perform some extra work to fully root the Google Pixel 7 smartphone, and you’ll get a prompt telling you that a reboot is required. Confirm this by tapping the OK button and then wait for the Pixel 7 to reboot on its own. Again, this boot cycle will not take long at all.
When you’re back into the Android operating system go ahead and open the Magisk app one last time.
This will tell you if the Magisk binaries are installed, and which version is detected by the application. You can then test everything out by downloading the ever-popular Root Checker application in the Play Store. Once installed, tap on the blue Verify Root button and you should get a prompt from Magisk asking if you want to grant this application root access or not. Tap on the Grant button and Root Checker should confirm that your device is rooted.
Android 15 QPR1 Beta 1 Root Guide
Conclusion
There have only been minor changes to how to root Google Pixel devices over the years. The only real difference these days is whether you need to patch the boot.img file or the init_boot.img file. And then to make sure you’re flashing the patched file into the correct partition.
This could change when the final stable version of Android 15 is released, but we won’t know until that happens. Which should be around October of 2024.
As always, if you have any trouble following this guide then do not hesitate to ask questions in the comments section below.
I have a moto g power 5G XT2415V that’s been updated to Android 16